BARCODE DATALINK Since 1991
Zebra printers · installing the ZDesigner driver

Twelve screens between a new printer and a working one.

Until the driver is in, every program tells you the same thing in a different way: a printer list with your printer missing from it. ZebraDesigner shows an empty box, Word shows everything except the Zebra, and nothing you press changes it. Zebra Setup Utilities is what fixes that, and this is the whole of it — our own ZM400, screen by screen, nothing skipped.

Two of the twelve catch people out. The welcome screen tells you not to use this wizard for a USB printer, and the model list offers the same printer twice in two different languages.

You need Zebra Setup Utilities first. It is free, it is the one that carries the driver, and it is a different download from the design program.

Zebra Setup Utilities → What the design software does →
Before you start

Three things, and one of them is a number.

The wizard will ask for them in this order, and it will not let you past the point where it needs the address.

01

The model and the dpi

Printed on the machine. 200 dpi and 300 dpi are separate drivers and the list shows both — a 300 dpi driver on a 200 dpi printer prints everything at half size.

02

The IP address

For a network printer, the number it answers on. A Zebra industrial machine will print you a configuration label with it, and it is on the front panel on the ones that have a screen.

03

Nothing, if it is USB

Do not use this wizard for USB. Zebra say so on the second screen below. Plug the printer in with the power on and let Windows find it.
Steps 1 and 2

Where it starts, and the warning on the way in.

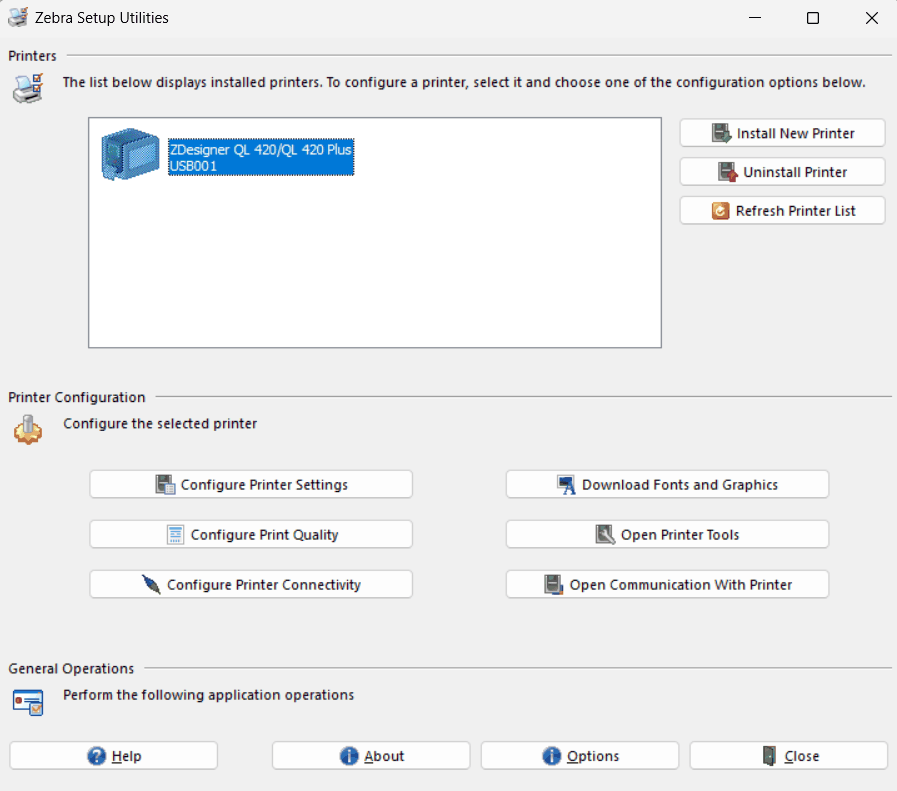
The Zebra Setup Utilities main window. The printer list holds one entry, a ZDesigner QL 420 on USB001. Install New Printer is the top button on the right.
Step 1 — Install New Printer. The list at the top is what is already installed; here that is one mobile printer on USB. Everything in the lower half of this window is greyed out or useless until the printer you want exists, which is the whole reason for the button at the top right.
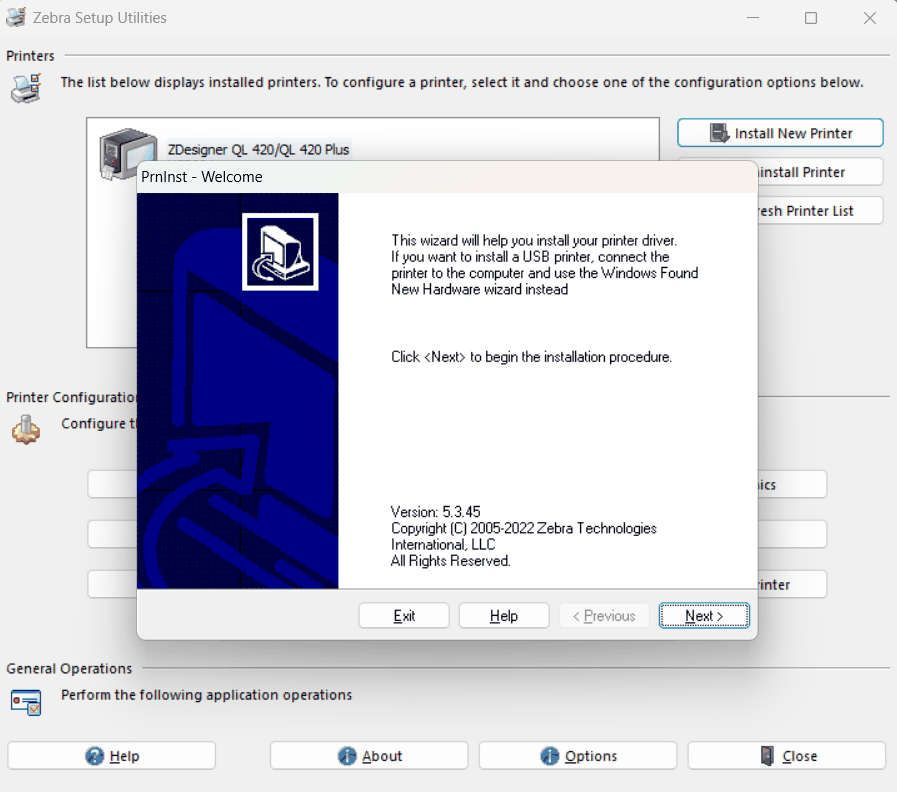
The PrnInst welcome dialog, version 5.3.45, saying that for a USB printer you should connect it and use the Windows Found New Hardware wizard instead.
Step 2 — read this one. The wizard that installs Zebra drivers opens by telling you not to use it for a USB printer. PrnInst 5.3.45 is the installer; the driver it lays down is a separate version number you will see at step 7.

Why the USB warning is there, and why it is worth obeying. A USB Zebra announces itself to Windows when you plug it in, and Windows matches it to a driver and a port on its own. Drive it through this wizard instead and you can end up with a driver pointed at a USB port that moves the next time the printer is unplugged — a printer that worked yesterday and prints to nothing today.
Steps 3 and 4

Two screens that are just clicks.

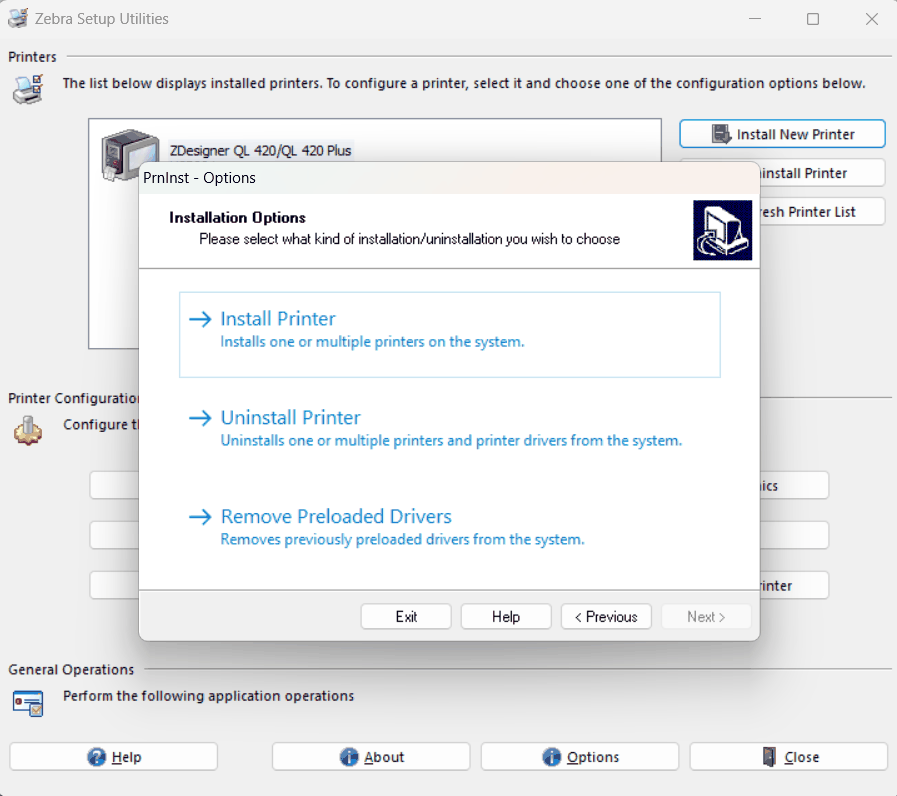
The PrnInst installation options screen offering Install Printer, Uninstall Printer and Remove Preloaded Drivers.
Step 3 — Install Printer. The other two are for taking things off. Remove Preloaded Drivers is the one to remember if a bad install ever needs clearing out properly.
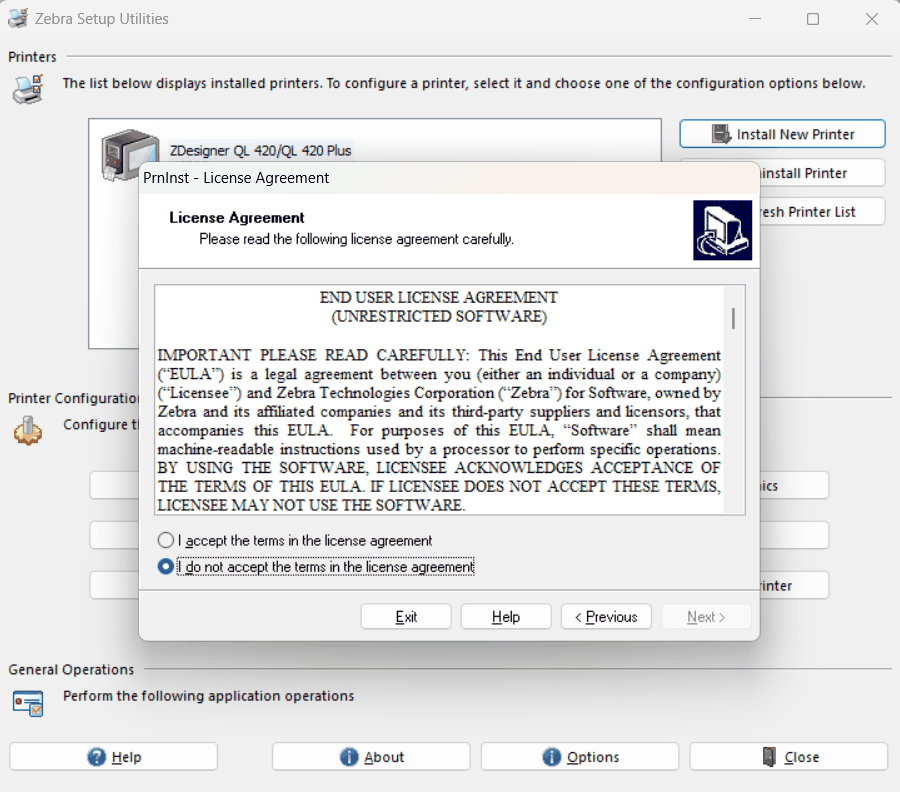
The PrnInst end user licence agreement screen. The selected radio button is I do not accept the terms in the license agreement.
Step 4 — the licence, and it says no by default. Look at which radio button is filled in. You have to actively choose to accept; Next stays greyed out until you do.
Steps 5 and 6

One manufacturer, and your printer listed twice.

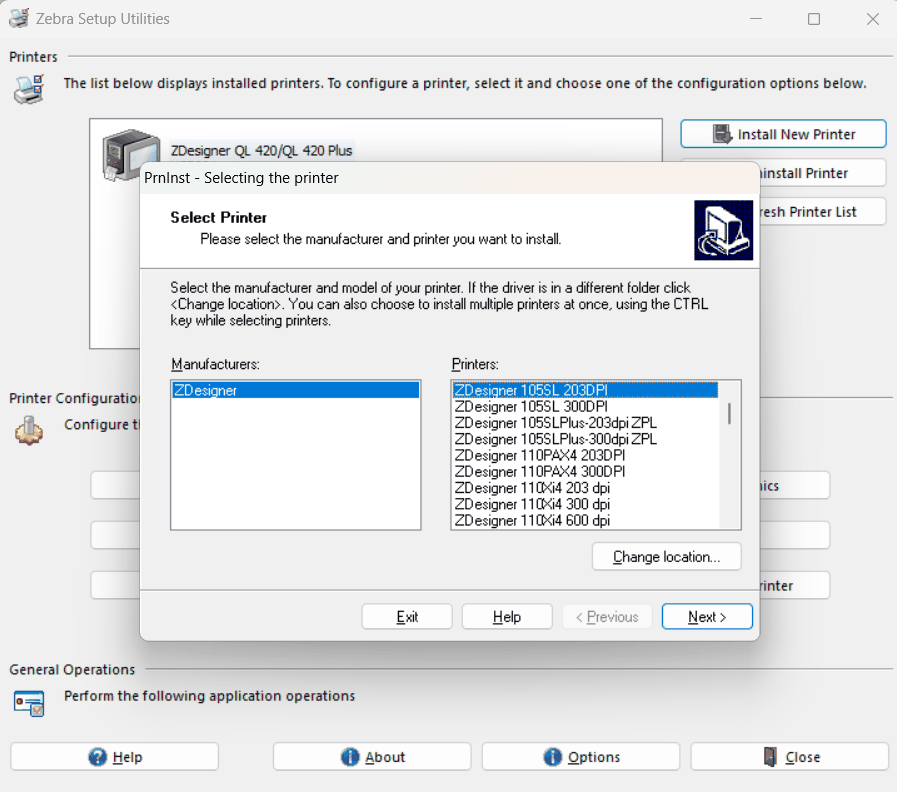
The Select Printer screen. The Manufacturers box contains a single entry, ZDesigner. The Printers box is scrolled to the top of the list at ZDesigner 105SL 203DPI.
Step 5 — there is only ever one manufacturer. ZDesigner, on its own, and that is not a filtered view. It is the name Zebra's own drivers go by, which is why a Zebra never appears in Windows under the word Zebra.
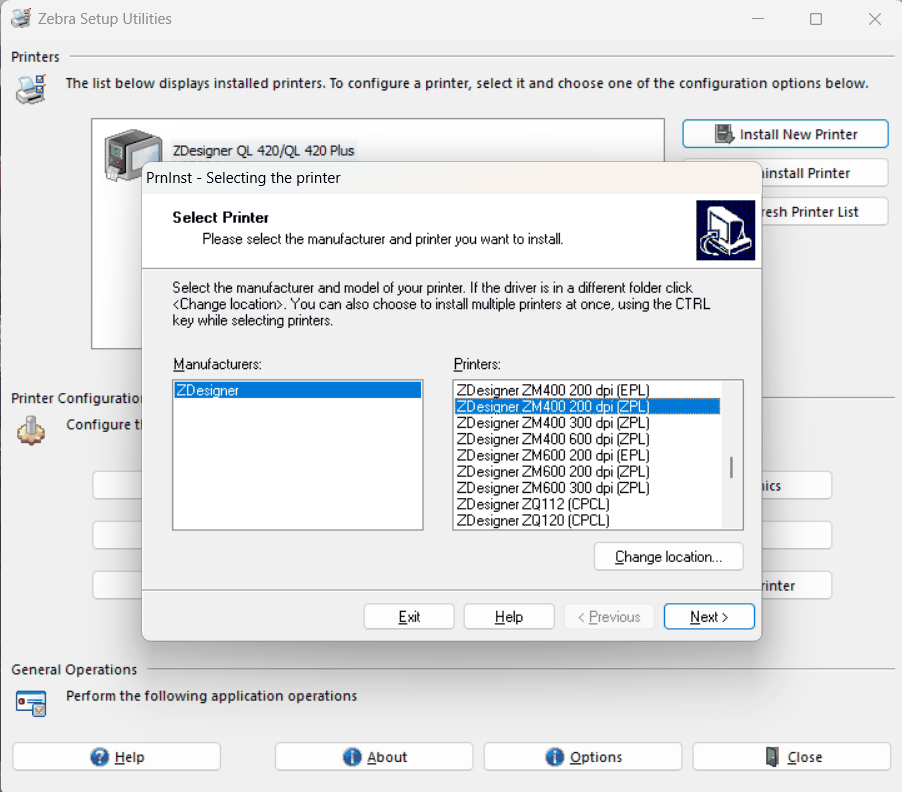
The same screen scrolled down to the ZM400 entries. ZDesigner ZM400 200 dpi (ZPL) is selected, with ZM400 200 dpi (EPL) directly above it and 300 dpi and 600 dpi ZPL entries below.
Step 6 — the one that costs an afternoon. The ZM400 is in this list four times. 200 dpi (EPL) sits directly above 200 dpi (ZPL), and below them are the 300 and 600 dpi drivers for the same machine.

Take ZPL unless you know you want EPL. They are two different printer languages and the driver speaks whichever one you pick here. ZPL is what every current Zebra uses and what every label program writes; EPL is the older Eltron language, kept for the desktop machines that were built for it.

The symptom of getting it wrong is not an error. The job goes, the printer takes it, and what comes out is blank, or a page of readable text where the label should be. Nothing says "wrong language" — so people chase the label size, the ribbon and the driver settings for an hour before anybody looks back at this screen.

And match the dpi to the machine. It is printed on the printer. A 300 dpi driver sending to a 200 dpi head puts everything out at half the size you designed.
Step 7

Name it, and tell it where the printer is.

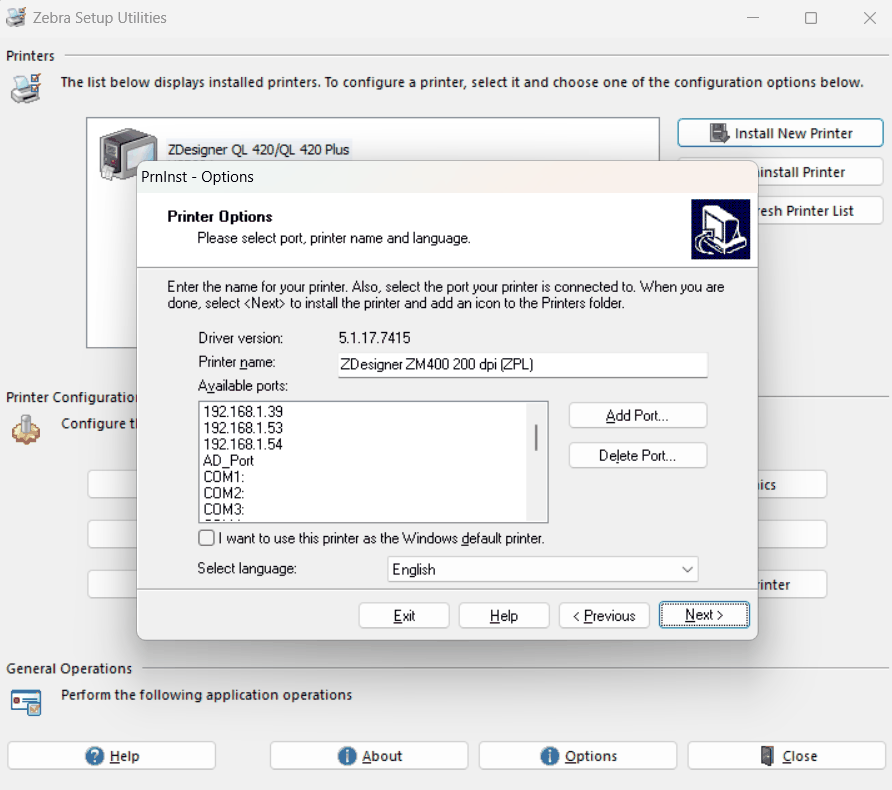
The Printer Options screen showing driver version 5.1.17.7415, the printer name ZDesigner ZM400 200 dpi (ZPL), and an Available ports list containing three network addresses, AD_Port and several COM ports.
Step 7 — driver version 5.1.17.7415. That is the driver, not the installer, and it is the v5 family — the right one for a machine of this age. The name is yours to change and the only thing that matters about it is that you can tell this printer from the next one in a list six months from now.

If the printer's address is not in that list, it does not exist yet. The list is every port Windows already knows about, which on a machine that has had printers before is a long and untidy history. Add Port is the next step, and it is the only part of this install where you type something that has to be right.
Step 8

The one that looks like something has gone wrong.

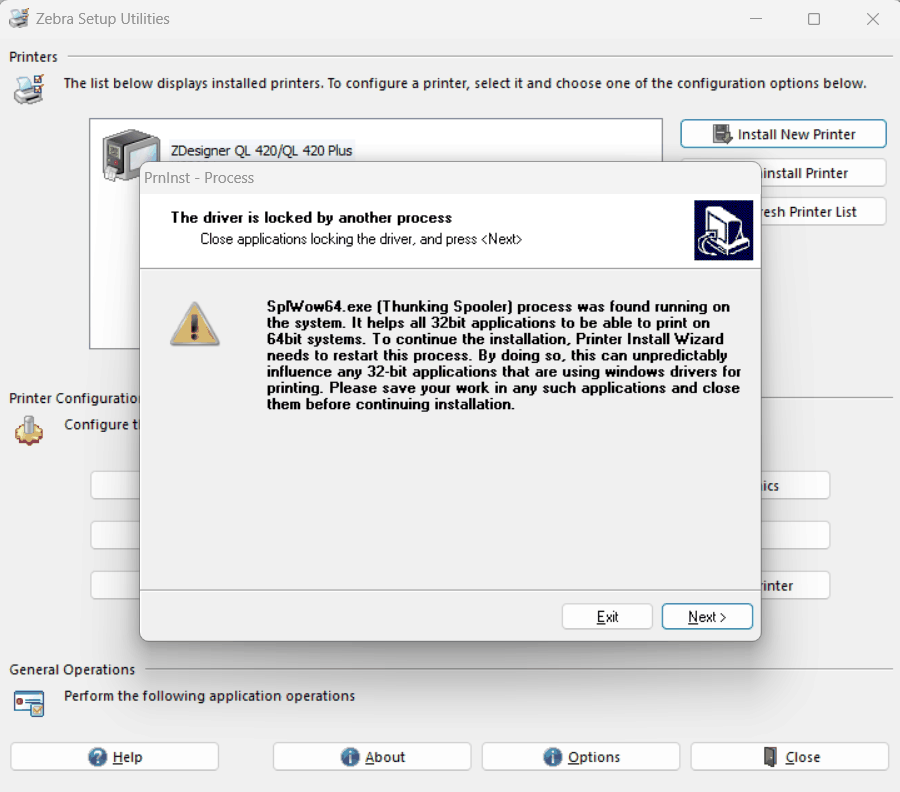
A PrnInst dialog headed The driver is locked by another process, explaining that SplWow64.exe the Thunking Spooler was found running and must be restarted to continue.
Step 8 — it is not a fault. SplWow64.exe is the piece of Windows that lets 32-bit programs print on a 64-bit system, and the installer needs to restart it. The warning is real but narrow: anything 32-bit that is mid-print can lose the job.

What to actually do. Save your work in anything that prints — an old accounting package, a label program, anything that has been on the machine for years — and then press Next. On a PC that is not printing anything at that moment, there is nothing to lose and nothing to decide.
Steps 9 and 10

Adding the port, which is the only thing you type.

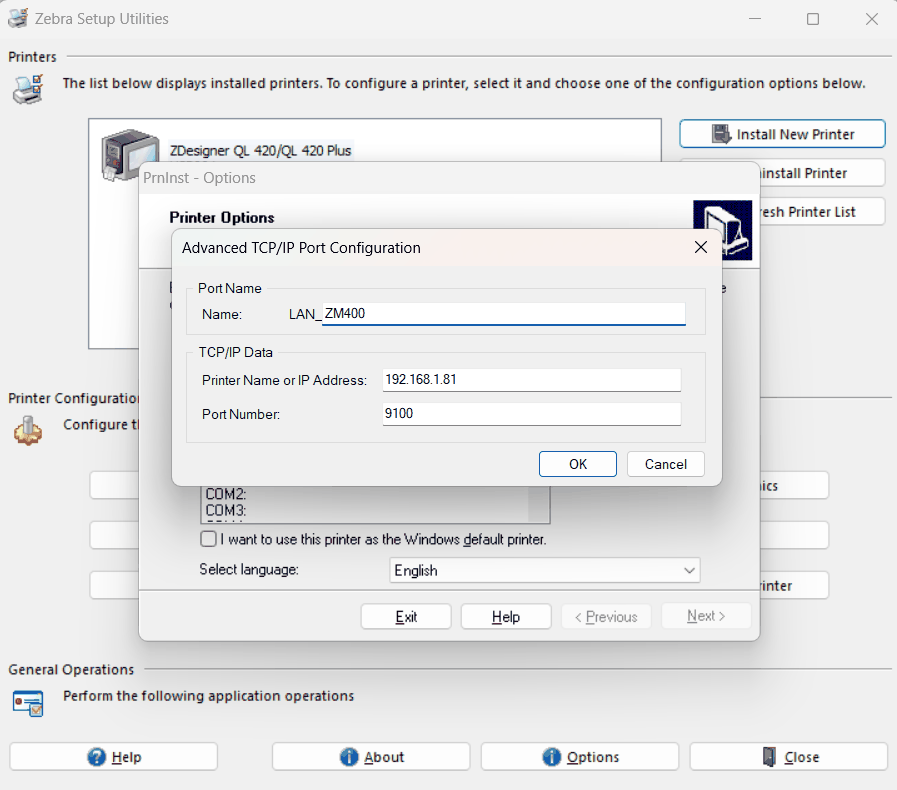
The Advanced TCP/IP Port Configuration dialog. Port Name is LAN_ZM400, Printer Name or IP Address is 192.168.1.81, and Port Number is 9100.
Step 9 — three fields, and only the middle one has a right answer. The name is free text and is worth spending five seconds on, because it is what you will be reading in a port list later. The address is the printer's. 9100 is the raw print port — what a network printer listens on for print data — and it is already filled in.
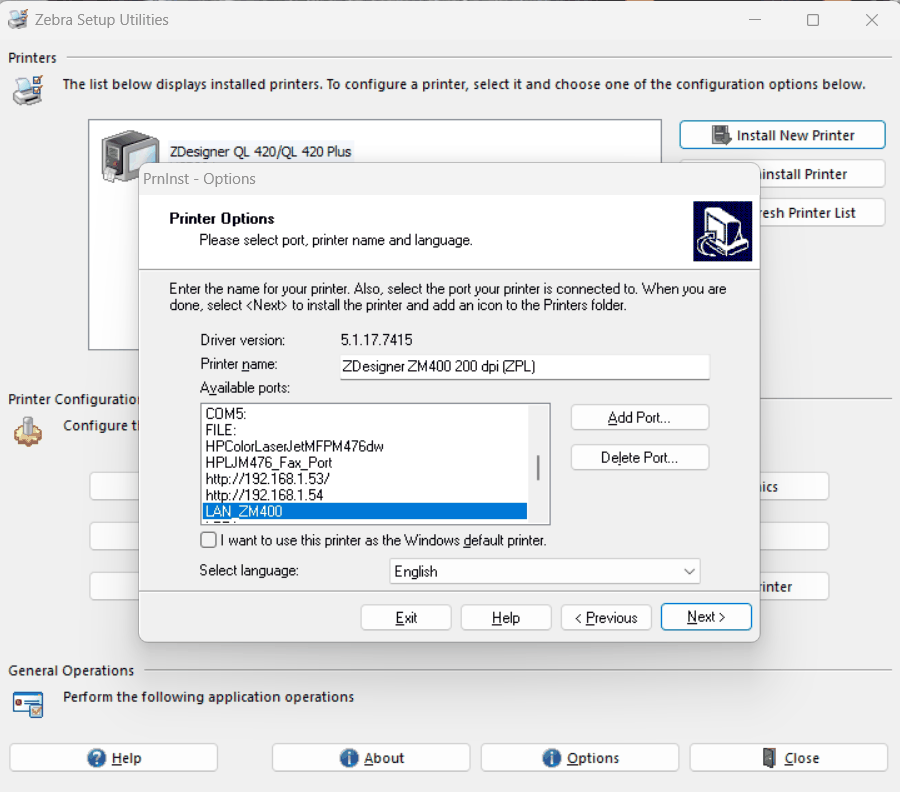
The Printer Options screen again, now scrolled to show LAN_ZM400 selected at the bottom of the ports list, with COM5, FILE, HPColorLaserJetMFPM476dw, HPLJM476_Fax_Port and two http addresses above it.
Step 10 — the new port, selected. LAN_ZM400 is now in the list and highlighted, and the install can finish. Note what else is in that list: a colour laser, a fax port and two web addresses.

That laser is worth a sentence, because it answers a question people ask. HPColorLaserJetMFPM476dw is in this list, and it is nothing to do with Zebra. A port list is every way out of the PC, not a list of Zebra printers — so seeing a non-Zebra here is normal and means nothing is wrong.

The same laser will never appear in a Zebra label program's printer list, because that list is drivers rather than ports, and it only holds what a ZDesigner driver was installed for. Two lists, two different questions, and this is the one that includes everything.
Steps 11 and 12

Two optional extras, and then it is done.

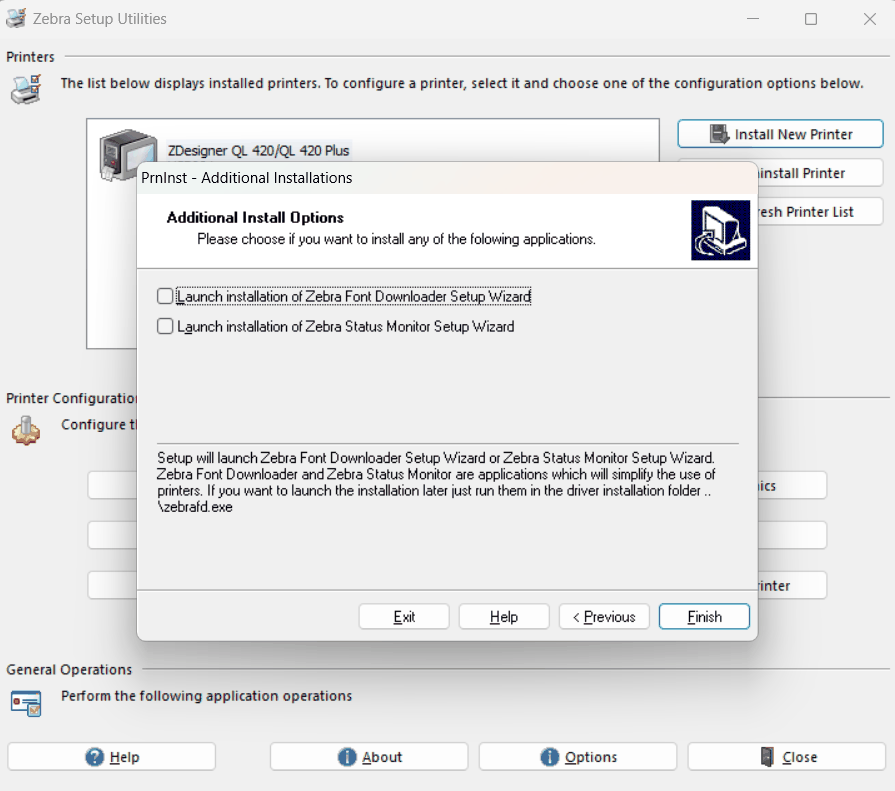
The Additional Install Options screen offering the Zebra Font Downloader Setup Wizard and the Zebra Status Monitor Setup Wizard, both unticked.
Step 11 — leave both unticked. Neither is needed to print. The screen itself says they can be run later out of the driver folder, so skipping them costs you nothing.
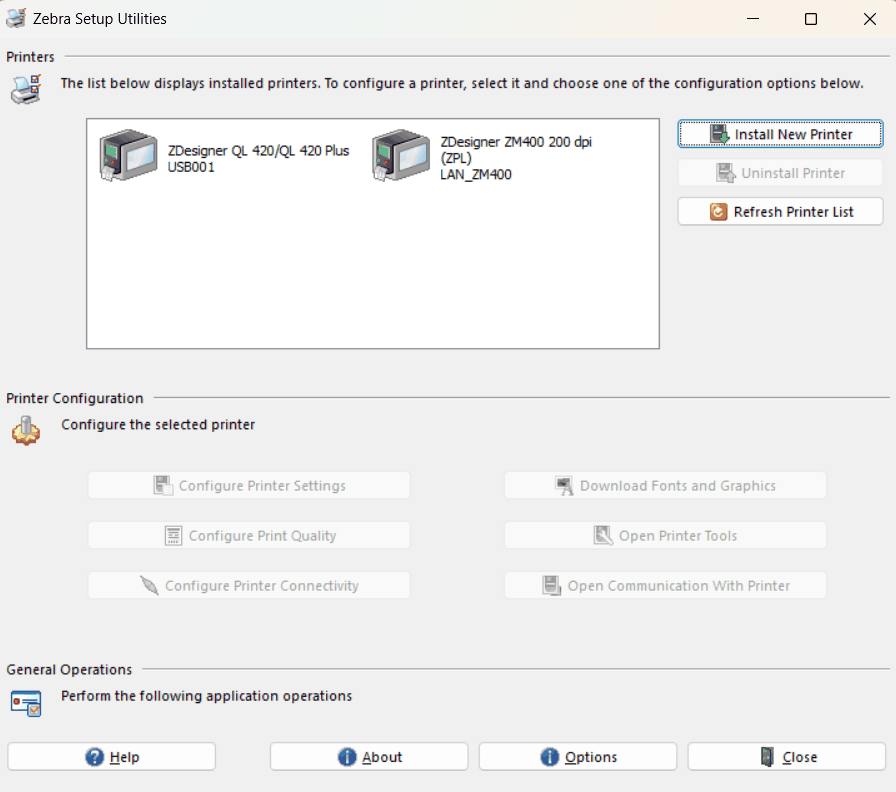
The Zebra Setup Utilities main window with two printers listed: the ZDesigner QL 420 on USB001 and a new ZDesigner ZM400 200 dpi ZPL on LAN_ZM400.
Step 12 — two printers. The ZM400 is in, on the port named at step 9. From here every program on the PC can see it, and the lower half of this window finally does something.

The design program will not notice on its own. If ZebraDesigner or BarTender was open while you did this, close it and open it again — they read the printer list once, at start-up.

If it still does not print

Four things, in the order they are worth checking.

01

Blank, or a page of text

Go back to step 6. That is EPL against ZPL almost every time, and the printer will not tell you.

02

Everything half size

Wrong dpi. A 300 dpi driver on a 200 dpi machine, or the other way round. Same list, same screen.

03

Nothing happens at all

The job is going somewhere that is not listening. Check the address you typed at step 9, and that the printer is on the same network as the PC.

And the fourth: it is a USB printer and you used this wizard anyway. Take it off with Uninstall Printer at step 3, unplug it, plug it back in with the printer switched on, and let Windows do it.

If you would rather not

We will do it on the phone while you watch.

This is a ten-minute job when it goes well and an afternoon when it does not, and the difference is usually one of the two screens above. If a printer has landed and nobody wants to be the one who installs it, ring us and we will walk through it with you on the machine it has to work on.