Fixed data
Text you type once at design time and that prints the same on every label. Your company name, a warning, a product description that never changes.
Nobody tells you the boundaries before you download it, so you find them one at a time over an afternoon. ZebraDesigner Essentials costs nothing, does not expire, and is genuinely enough for a great many people — but it will only ever print to a Zebra printer, it cannot read a spreadsheet, and version 3 quietly dropped some barcodes that version 2 had.
Get it from Zebra, free. Three separate downloads, and the one almost everybody wants is the first.
ZebraDesigner 3 is Essentials and Professional in the one installer. Essentials is the free one, it asks for no key, and it does not expire.
Zebra Setup Utilities is the one to run first, and it is the step most people miss. It carries the printer driver with it and it builds the network port for you — and until a ZDesigner driver is installed, the design program has nothing to print to and shows you an empty list.
ZebraDesigner for Developers is a different program again, also free, for turning a label into a ZPL template something else can fill in. It is not inside the other installer, which is why most people never find out it exists.
This page is the detail. It is Zebra's software, not ours, downloaded from Zebra and free from Zebra — we have nothing to sell you here. If you want the wider question of which label program you should be on at all, that ladder is on the BarTender page.
Put a text box on a label in the free edition and open its data source, and this is everything the menu offers. It is the clearest statement of what Essentials is, and it is a statement the marketing never makes.
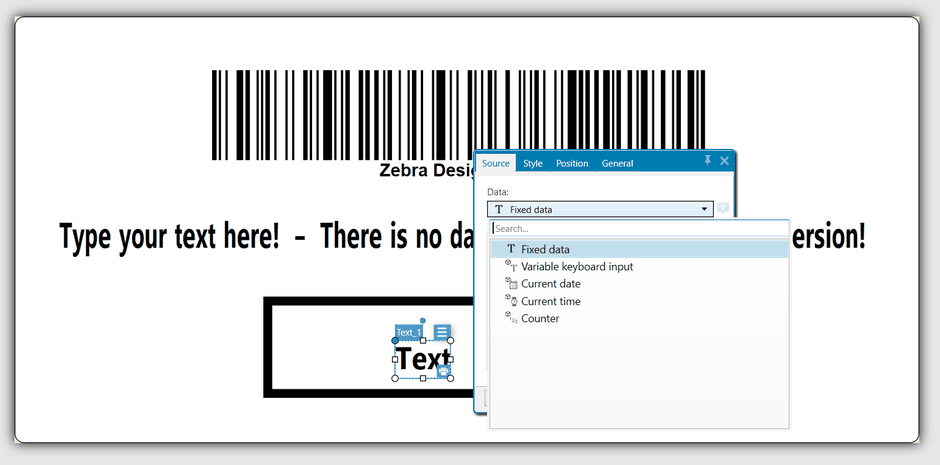
Text you type once at design time and that prints the same on every label. Your company name, a warning, a product description that never changes.
The one that does the work. The field is left empty in the design, and the operator is asked for it each time they print. This is how a free label becomes a useful one.
Today, taken from the computer. Offsettable, so a label can carry a date a number of days ahead without anybody working it out.
The clock, same idea. Useful on a batch or shift label where the question is when it came off the line.
A number that steps on every label. Serials, carton numbers, sequence. It can be set to remember where it got to between sessions.
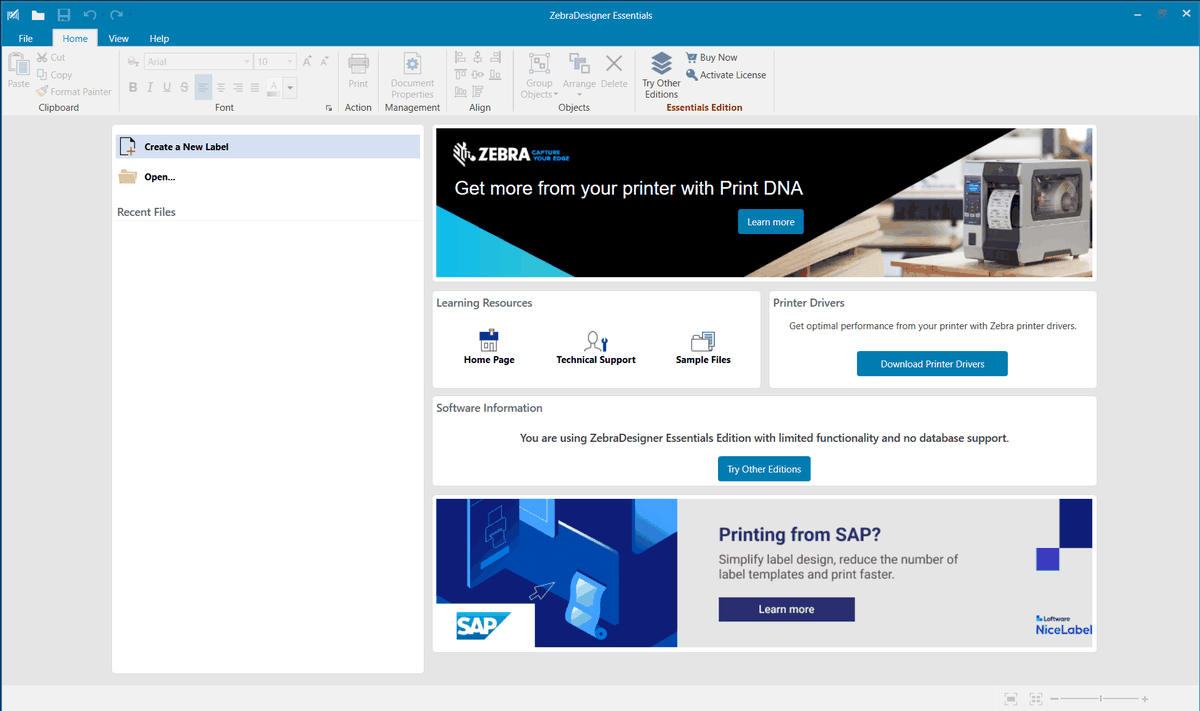
There is no database entry in that menu, and the application says so itself on its own start screen: “limited functionality and no database support”. That is the line, and everything below is on one side of it or the other.
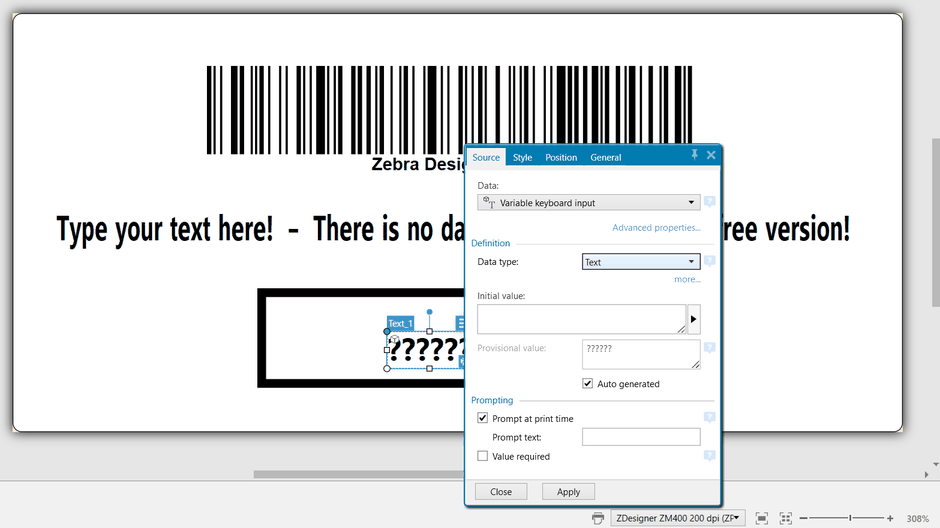
What that looks like in practice. You design a use-by label once. The date field is set to variable keyboard input with the prompt “Enter in the Use by Date”. From then on, whoever prints it is asked that one question, types the date, and the label comes out. No licence, no database, no integration — and for a kitchen, a packing bench or a small production run, that is the entire job solved.
Tell the field it is a date and the operator gets a calendar rather than an empty box. It is a small thing that matters more than it sounds: a use-by date typed by hand is a use-by date that can be typed wrong, and a picker will not let somebody put in a month that does not exist. The same field can be made compulsory, so a label cannot be printed with it left blank.
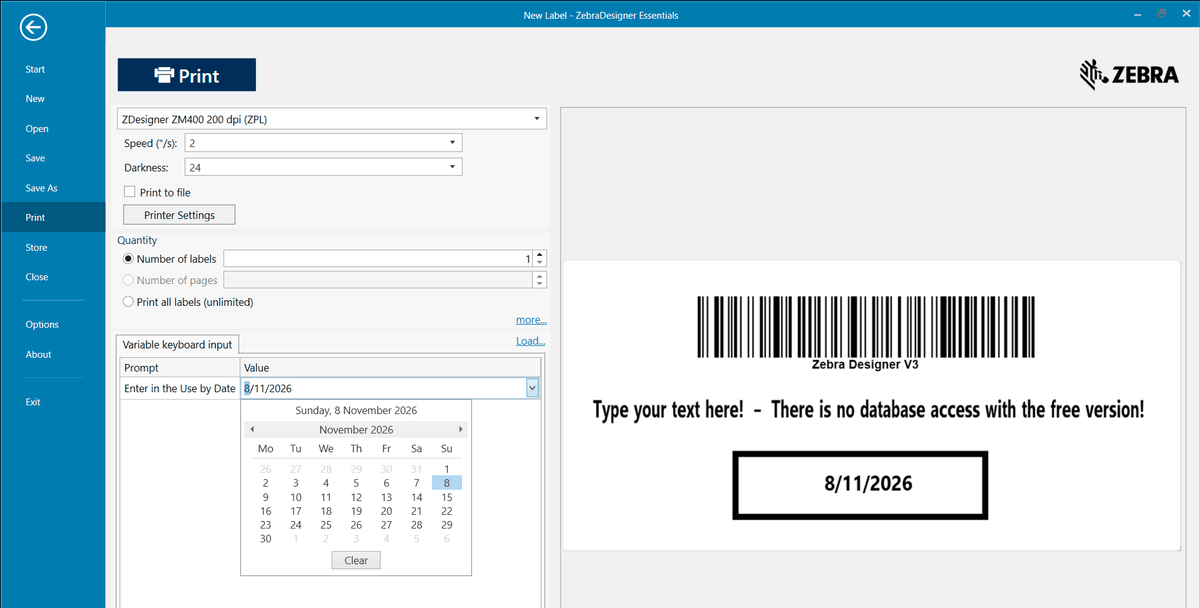
One caution on dates: the format follows the Windows regional setting on that computer, not the label. A machine set to US order prints the same date the other way round, which on a use-by label is not a cosmetic difference. Worth printing one and reading it before the first real run.
The moment the answer to the prompt is already sitting in a spreadsheet and somebody is retyping it off a screen, you have found the edge of the free edition. That is what Professional is for, and it is a one-off key rather than a subscription.
This is the first wall people hit and it reads like a fault. It is not. It is the single most important fact about this software and the reason it is free.
ZebraDesigner does not list Windows printers. It lists ZDesigner drivers. Zebra's own release notes put it plainly — “the ZebraDesigner label design application requires the ZDesigner Windows driver to communicate with your printer” — and that one sentence explains every surprise in the printer list.
Laser, inkjet, the multifunction down the hall, a PDF writer — none of them will ever appear, no matter what you install or which box you tick. Windows can see them perfectly well. This program is simply not for them.
If you need a barcode on an A4 sheet out of a laser, this is the wrong tool and no setting fixes it. A4 sheet labels are a different job done a different way.
Because what gets listed is the driver, not the device. Install the ZDesigner driver for a printer that is unplugged, switched off, or still in its carton, and it shows up in the list straight away and you can design against it.
That is genuinely useful — you can build and size your labels before the printer arrives — but it also means a printer appearing in the list is not evidence that it is connected.
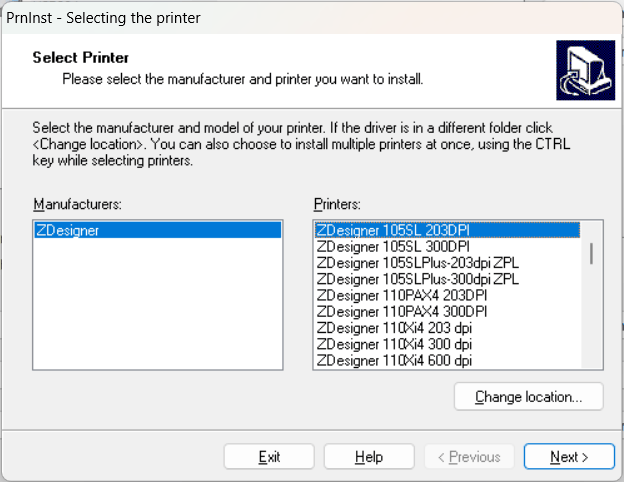
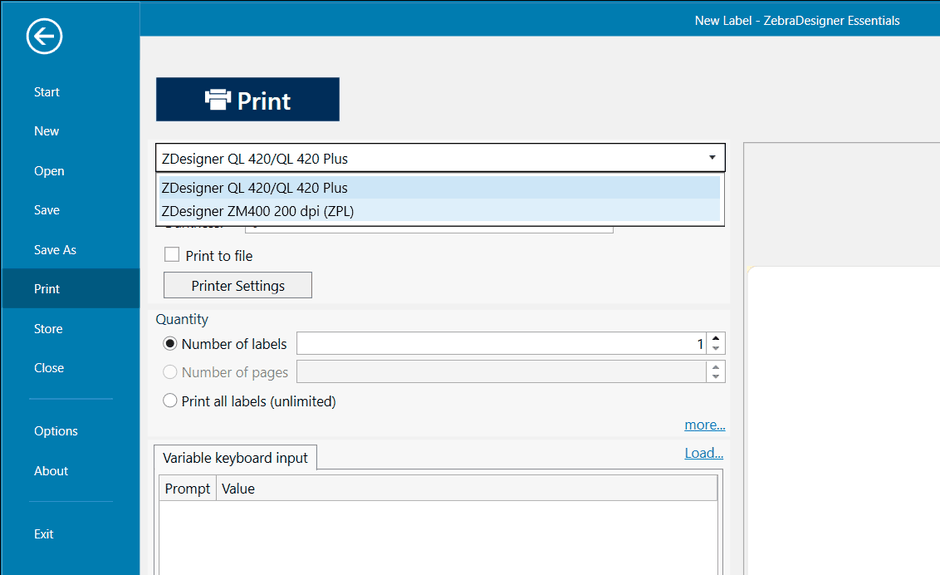
And it is pickier than just “a Zebra”. If another label program has already installed its own driver for your Zebra, that driver is usually not a ZDesigner one — it will be named after the printer, where a ZDesigner driver is named ZDesigner first. ZebraDesigner cannot see the other sort. You end up with the same printer installed twice under two different drivers, which is normal and harmless, but worth knowing before you spend an hour wondering why a printer you are already printing to every day is missing from the list.
Getting the software running is five minutes. Getting the right driver on is the part that decides whether anything works, and the choice is not obvious.
The modern ZDesigner driver, and what Zebra recommends wherever it applies. It is downloaded from your printer's own support page on Zebra's site. If you have bought a printer in recent years, this is the one.
Still current, still supported, and the only answer for an older machine. This is also the driver that Zebra Setup Utilities installs, which makes ZSU the quickest route for an older printer — it carries the driver with it and adds the network port for you in the same wizard.
Check the readme, not the website. Zebra has trimmed the model list shown online down to current products, but the drivers themselves still carry the older models. The supported list that counts is the readme file inside the driver download. A printer missing from the web page is not necessarily missing from the driver.
The driver list has one entry per model, per resolution, per command language. One industrial printer can appear four or five times — 200 dpi in one language, 200 dpi in another, 300 dpi, 600 dpi — and they all look equally correct.
Pick the wrong resolution and nothing warns you. There is no error. The labels simply come out at the wrong size, or with text and barcodes scaled oddly, and it looks like a design problem rather than a driver problem. The printer's own configuration label tells you its resolution; print one and read it before you choose, because this is a mistake that costs an afternoon.
The driver installer may tell you it needs to restart the 32-bit print spooler, and warn that doing so can upset other programs that are printing at the time. It means it. Shut the other label program, and anything else with a print job open, before you run it — it takes ten seconds and saves an unexplained failure later.
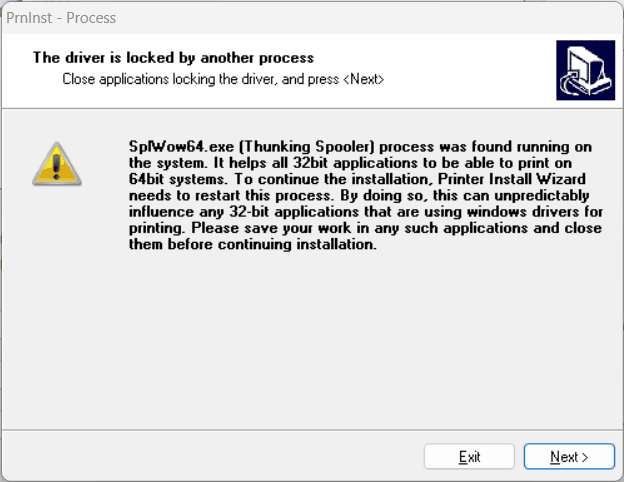
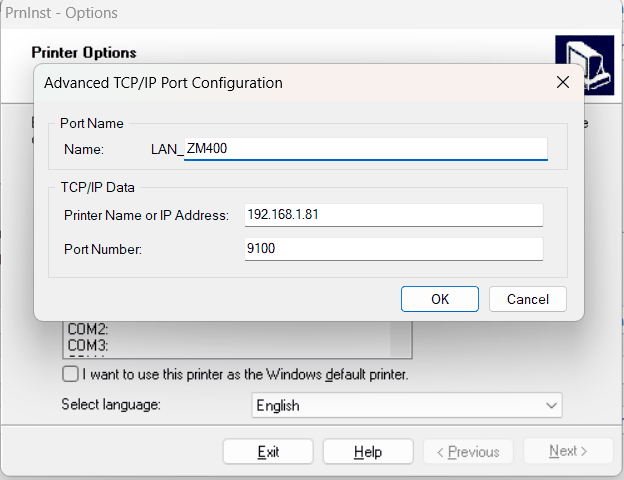
Zebra Setup Utilities is the companion piece and it is the one that saves the afternoon. It carries the driver with it, and it will create the network port for you — a name, the printer's address, and the port number — which is the step people lose an hour to in the Windows Add Printer dialog.
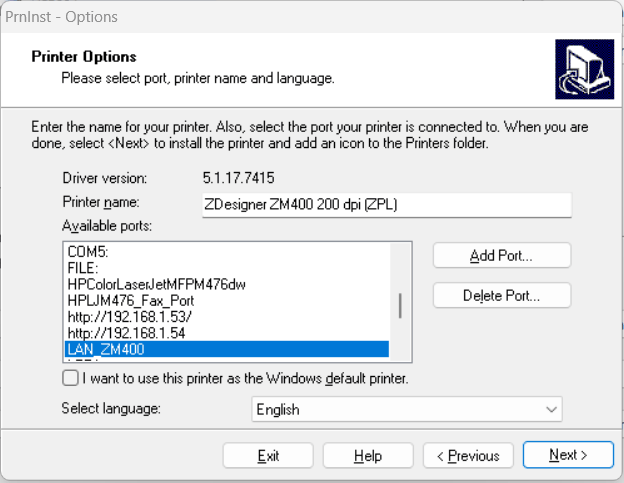
It does more than install. From the same window you can set print quality, change the printer's own configuration, send fonts and graphics into its memory, and open a plain window that talks to the printer directly — which is how you find out whether a machine is answering at all before you blame the software. If a printer will not print, this is the tool that tells you why, and it is free from Zebra like everything else on this page.
Between them these account for most of the first hour with this software, and neither has anything to do with your design.
There is a rotate 180° tick box on the Options tab of the ZDesigner driver's properties. If your print comes out inverted relative to what you designed, that is almost always it. Untick it and the label matches the screen.
Do not go looking for a mirror setting. There is one — Mirror Image, on the Advanced Setup tab — and it is a different thing entirely. Mirrored means the text reads backwards, as if through glass. Rotated means upside down but still readable. If your label is readable, the mirror box is not your problem and should be left alone.
Where you untick it decides how far the fix reaches. Reached through the design program, it applies to that label. Set in the Windows printing preferences for that printer, it becomes the default for everything that prints to it. Set it in Windows, or you will meet the same label upside down again from a different program.
One more place it can live: the printer itself holds a print orientation in its own firmware, settable from the front panel. If the driver setting is off and the label is still inverted, that is where to look next.
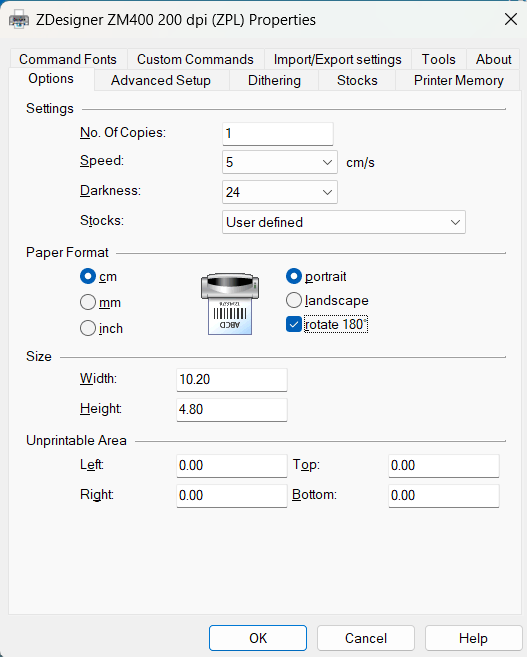
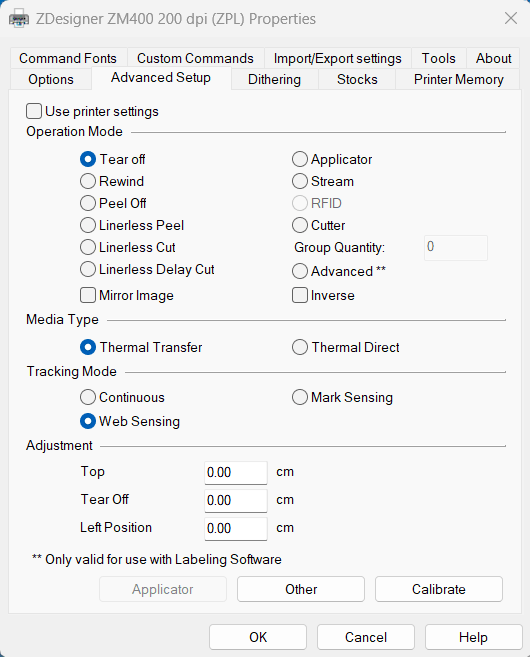
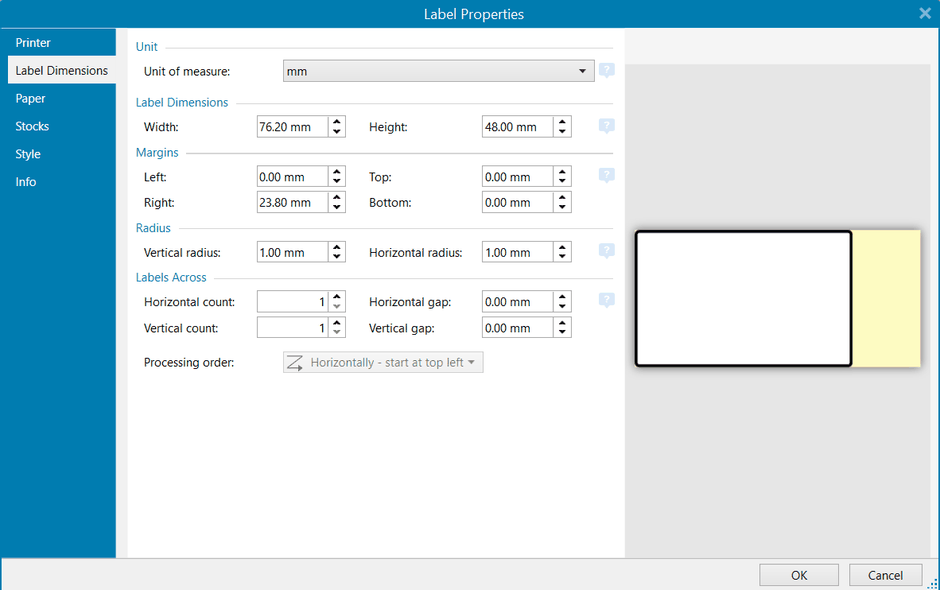
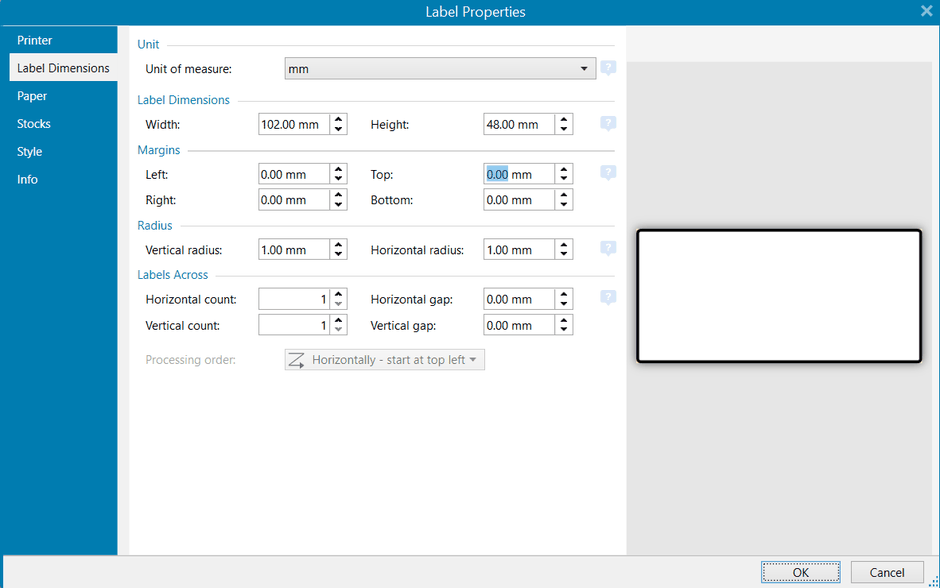
Three things hold an opinion about how big your label is: the document, the driver, and the stock actually in the printer. The print is only right when all three agree, and the software will not tell you when they do not.
The tell is a margin you never typed. If your label is set narrower than the driver's page, the design program pads the difference out as a margin on one side — so a label that measures 76 mm sitting in a driver page set to 100 mm quietly acquires a 24 mm margin, and everything shifts. Nothing is broken; two numbers simply disagree.
Measure the label itself — across and down, the liner does not count — and put that same number in both places. If you are not sure what you have got, we can tell you from the part number, or from the roll.
This is the one that matters here and almost nothing written about this software mentions it, because almost nothing written about this software is written in Australia.
ZebraDesigner 3 dropped a list of barcode types that version 2 could print, and Australia Post 4-state is on it. So are Royal Mail, KIX, every Postnet variant, Pharmacode, Code-32, Codablock F and GridMatrix.
And it does not warn you kindly. Open a version 2 label containing one of those barcodes in version 3 and the barcode object is removed from the label. You get a report telling you it happened, and if you are not reading it carefully you have a label that looks nearly right with the one thing missing that the post office needs.
If you print Australia Post 4-state barcodes, do not upgrade until you have somewhere else to print them from. That is a real reason to be on BarTender rather than a sales argument for it.
Embedded OLE objects are gone and are removed on open. Custom check-digit algorithms are gone, with scripting as the replacement in the paid edition. Graphics downloaded into the printer's memory are no longer supported. A field can now only be linked to another field if that field is variable, so version 2 labels with fields linked to fixed text need reworking before they can be edited.
Rectangles now take a single thickness rather than separate horizontal and vertical. DataMatrix codes are promoted to ECC 200 on open. PDF417 aspect ratios are adjusted to stay standards-compliant, which can change the size of a barcode you had fitting exactly. Version 3 will open your old labels — it is just worth printing one of each and checking it before you throw the old machine away.
There is a Print to file tick box on the print screen, and what comes out is not a spool file. It is the printer's own command language, in plain text, from a program that cost nothing.
That is worth knowing if anything other than a person is ever going to print your labels. Design it visually, tick the box, print once, and you have the commands your printer actually obeys — ready to be sent by a script, a handheld application, or a system that prints without anybody opening a designer.
And the driver's settings travel with it. Darkness, print speed, thermal transfer or direct, how the printer finds the gap between labels, which way up it prints — all of it is written into the file alongside the design. That is genuinely useful, because it means the file prints the same from anywhere. It is also the first of two things to be careful about.
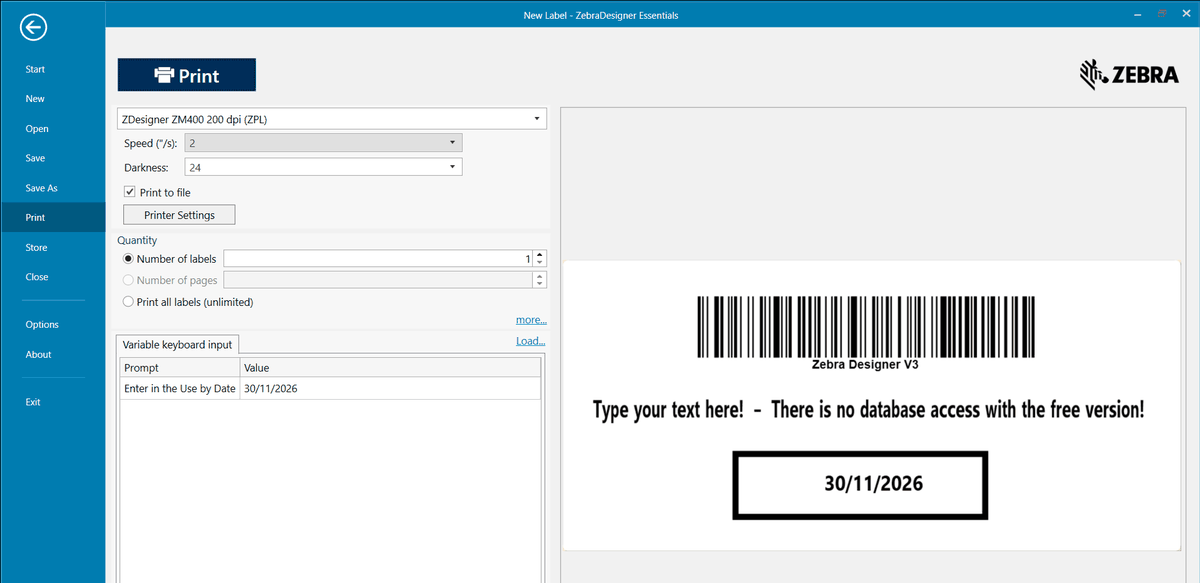
Because those settings are in the file, sending it to a shared printer reconfigures that printer for whoever prints next. On a machine that one department uses for one label, that is exactly what you want. On the printer the whole warehouse shares, it is how somebody else's labels come out too dark on Monday morning. Know which sort you are aiming at.
The file does not begin with a printer command. It begins with a byte-order mark and a control character — four bytes that are not ZPL and that your text editor will not show you. Printers often swallow them without complaint, which is worse than if they did not, because the day one does not you are looking at the design rather than at four invisible bytes.
If you are sending the file raw from your own code, start from the first printer command and throw away everything before it. That one line of defensive code is the difference between "it works on my PC but not from the system" and it just working.
This is the limit, and it is the honest end of what free will do. Whatever the operator typed at print time is baked into the file as fixed text. Print a use-by label with one date and you get a file that prints that date, for ever. There is no placeholder left in it for your system to fill.
For labels stored in the printer with fields your system fills in, Zebra has a separate free tool aimed squarely at developers, and BarTender exports templates too. But for the common case — a handful of fixed label layouts that a system needs to fire off on demand — print to file out of the free edition is a perfectly respectable way to get them, and it costs nothing.
Essentials and Professional are the same download and everybody finds them. The third is a separate program, costs nothing, and is the right answer to a question the other two cannot solve.
Everything above. Design, print, five data sources, a wizard for GS1-128 barcodes, and about twenty interface languages. No key, no expiry.
Where it stops: no database, no RFID, no scripting.
The same program with the rest switched on by a key. Databases — a spreadsheet, an Access file, a text file, or ODBC to a real one. RFID encoding. Simple scripting for the awkward cases, and the ability to join fields together.
One computer per licence, and a one-time key rather than a subscription.
A different program with a different job: it designs templates, not labels. What comes out is a format with named fields left empty, for a system to fill in and fire at the printer — which is exactly what print-to-file cannot give you.
Receipts and variable-length formats too, which matters for mobile printers. If you are writing software that prints, start here rather than with the other two.
So the order of questions is: who fills the label in? A person typing, every time — Essentials, free, done. A spreadsheet or a database, with a person pressing print — Professional. A system, with nobody there — the Developers edition or BarTender, and which of those depends on whether you are writing the code yourself.
You can try the paid level before you buy it. Professional runs as a 30-day trial started from inside the program, with nothing held back — so the question of whether a database connection solves your problem can be answered for nothing, on your own data, before any money moves.
Essentials needs no key and is not a trial. Professional does, and if yours is a few years old there is something you need to know before you next reinstall.
No key, no account, no expiry, no nag that turns into a lock. Essentials and Professional are the same download; it runs at the free level until a key is entered, and there is a 30-day Professional trial you start from inside the program if you want to see what the paid level does first.
Zebra moved its licensing to a new platform. Professional keys beginning 3467 can no longer be activated or deactivated at all, and the old version-2 key numbers were never valid in version 3 either.
If you hold one, it is replaced free — but you have to ask for the replacement, and the moment you find out is usually the moment you are rebuilding a PC and need it working today.
Two more things that catch people out. Activation needs the computer to reach Zebra's licensing server on the internet, which is a question worth asking before you install it on a machine in a warehouse with a tight firewall. And virtual machines and Remote Desktop are not supported — the trial will not even start on a VM. If your users run everything on a terminal server, this software is not the answer and BarTender is, because it is licensed and documented for exactly that.
A Professional licence covers one computer. If three people need to design labels, that is three licences, and at that point it is worth doing the sums against the alternatives rather than buying three.
Almost certainly. It is a Windows program — 10 or 11, or Server 2019 and later — and it wants about 2 GB of memory, a gigabyte of disk, a screen of at least 1366 by 768, and the Microsoft .NET Framework version 4.7.2, which most machines already have. There is no Mac version, no Linux version and no browser version, and there is not going to be one.
Windows 7 and 8 were dropped some years ago along with the older .NET versions, so a machine still on those will not take the current release. That is usually a sign the machine has a bigger problem than label software.
Yes, and that is a fair question about free software. Version 3 arrived in 2019 and has been updated steadily ever since — the most recent build at the time of writing is from late 2025, and the changes in between have been real ones: licensing moved to a new platform, the GS1 standard was brought up to date more than once, newer Windows Server versions were added, and a security hole in the installer was closed.
It is not abandonware and it is not a stripped demo designed to annoy you into buying something. It is Zebra making sure that a printer they sold you is easy to print to, which is a motive you can rely on.
Everything on this page is something people hit by doing these in the wrong order. Done in this one, the whole thing is about forty minutes.
Model, and its resolution. Print a configuration label from the printer itself — it tells you both, and it settles the question before a wrong guess is baked into a driver.
Before the design software, not after. Right model, right resolution, right command language. Nothing else on this list works until this is correct.
From Windows, before you design anything. If that does not come out, the problem is the cable, the port or the printer — and it was never going to be the software.
Across and down, the actual label and not the backing. Put that number in the driver and in the document, and check the margins are zero unless you meant them.
One rectangle the full size of the label. It shows you instantly whether the size is right, whether it is upside down, and where the edges really are — with nothing else on the label to confuse the picture.
With the real scanner, from the real distance. A barcode that looks perfect on screen can still be refused on the label — usually because it has been sized to fit rather than sized to scan.
Step five is the one people skip and it is the one that saves the afternoon. A blank box tells you about size, orientation and margins all at once, in one print, before any design decisions have been made on top of a wrong foundation. Thirty seconds and a label.
Essentials is free from Zebra and we would be doing you no favours pretending otherwise. What we charge for is the afternoon you would otherwise spend on the things above.
The right driver for your actual printer, the label sized to the stock you actually have, your first templates built with your own part numbers, and the person who will be printing them taught how to change one. Over AnyDesk, anywhere in Australia, or onsite in Sydney.
Charged by the hour. The rate is on the BarTender page, where it lives in one place so there is only ever one number to keep right.
Which driver, which resolution, why it prints upside down, whether your old labels will survive the upgrade — those are minutes, not hours, and we would rather answer them than watch somebody buy software they do not need.
We can also quote the Professional key if you decide you want it, and tell you honestly when you do not.
And the honest ceiling. If what you actually need is labels printed rather than labels designed, none of this is your problem — we print them and they arrive done. If what you need is labels filled from a system rather than from a keyboard, that is BarTender and a different conversation. ZebraDesigner sits exactly between the two, and it is free, which is why it is where we tell most people to start.
Tell us the printer model and what the label is doing, and you will usually get the answer on the phone. Thirty-five years of these, and they repeat.
