It prints. You just cannot read it.
Grey where it should be black, barcodes that scan on the third try, small text you have to hold up to the light. Before anybody sells you a printhead: this is usually two settings, and both of them are free.
The printer is running faster than the heat it has been given. Slow it down, turn the heat up, and most of these come good.
Speed and heat are one setting pretending to be two.
Every label is printed by heating elements for a fraction of a second as the media goes past. Run the media past faster and each dot gets less time under the heat.
So a printer set to a reasonable darkness at a slow speed prints beautifully, and the same darkness at twice the speed prints grey. Nothing has broken and nothing is worn. The two numbers have simply drifted out of step with each other, usually because somebody wound the speed up to get a run out of the door.
Two steps, in this order.
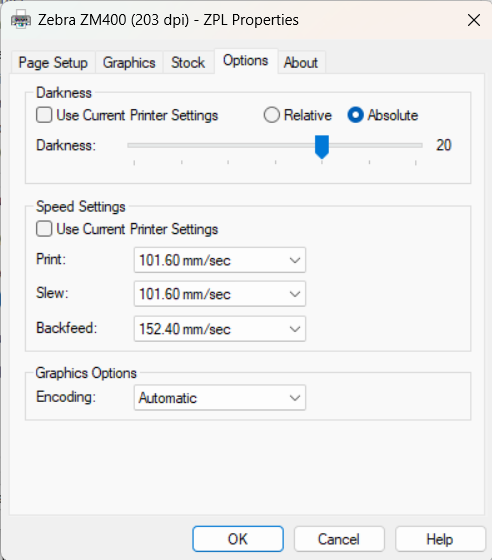
Both live on the Options tab of the driver, next door to the Stock tab.
Slow the print speed down
Four inches a second — 102 mm — is the usual first move, and on its own it fixes a good share of them. Do it before you touch the heat, because it changes what the heat needs to be. Set the darkness first and you will only have to set it again.
Go slower still if you want the best the machine has. Two inches a second, 50 mm, improves print quality greatly — worth it for small text, dense barcodes, and anything that has to scan first time rather than third.
Then the darkness, five units at a time
The scale runs 0 to 30. Most stock prints well between 15 and 25, and the majority of it lands around 20 to 25. If you are nowhere near that band, that is your answer before you start.
Not in one jump. Five, print a label, look at it, five more. You are hunting for a sweet spot and it is easier to find from underneath.
You have gone far enough when it is clear without being patchy. Keep going past that and it starts to go the other way: too hot and the edges melt into each other, letters fill in, and the bars of a barcode close up until a scanner reads two as one.
Too light and too hot both produce a barcode that will not scan, which is why the sweet spot is a spot rather than a direction.
30 is extreme, and it will typically burn right through the ribbon. If you have wound it that far and it is still not right, the heat was never the problem. Go back and take the speed down instead.
The exception: resin ribbons and synthetic materials. Those sometimes want 27 or 28 to come out properly. That is a deliberate choice for a difficult stock, not a number to start from — and if you are running resin onto synthetic and fighting it, ring us before you keep winding the heat up.
Both numbers, on one tab.
The Options tab of the same driver the Stock tab lives on. This is our own ZM400.
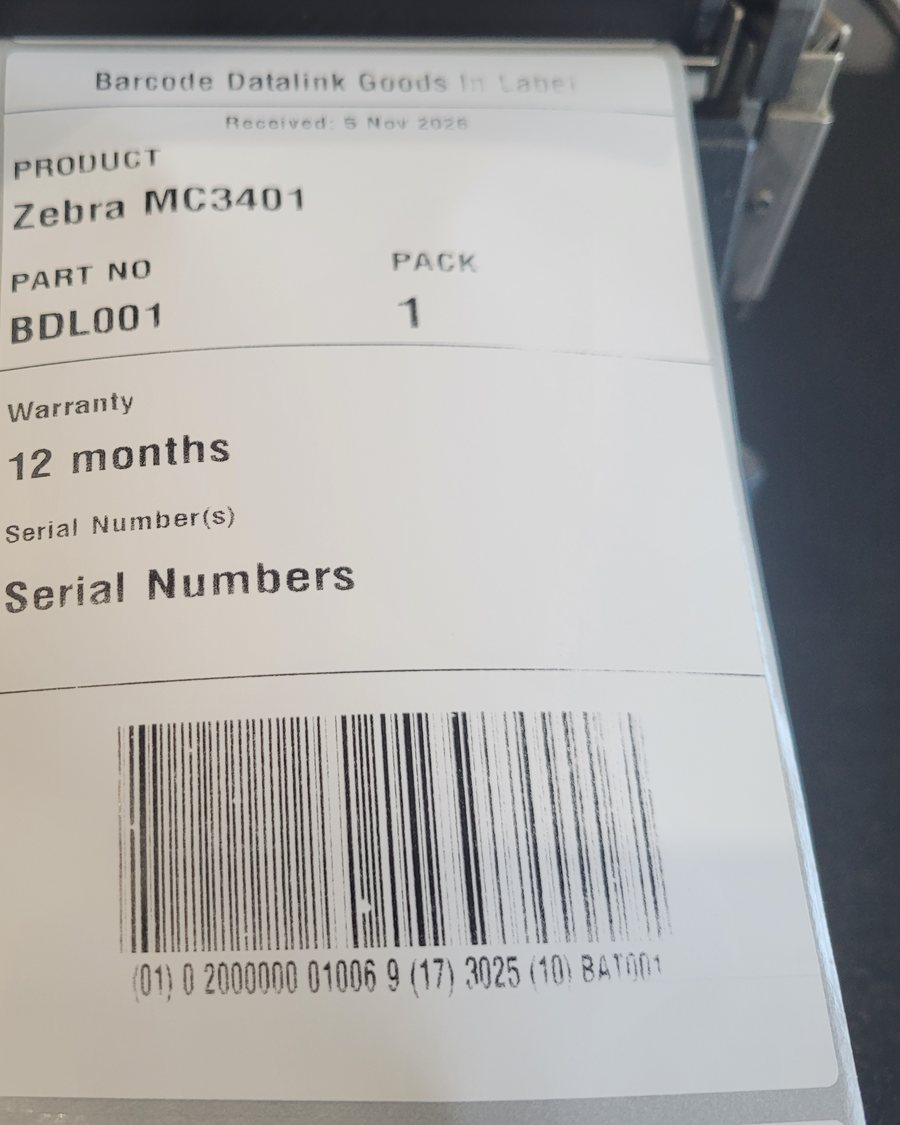
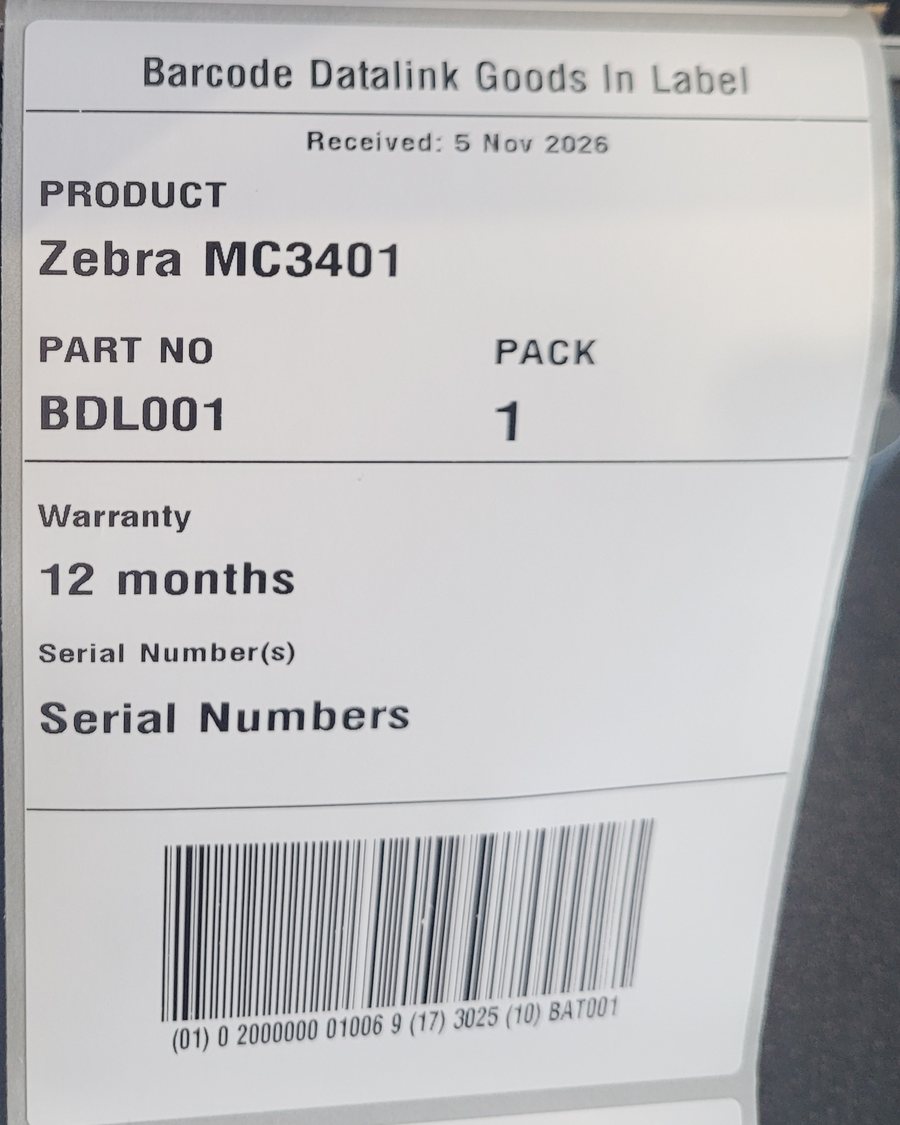
What the difference actually looks like.
Same machine, same stock, same ribbon, minutes apart. Neither photograph has been touched up.
Work up from free to expensive, not down.
The order matters, because each step costs more than the one before it and the cheap ones fix most of it.
Clean the head and the platen roller. Two minutes and an alcohol swab. Printing through grit and dried adhesive makes a good head behave like a worn one — the cleaning, step by step →
Check the ribbon suits the label. The wrong ribbon for the stock prints light no matter what the darkness says, and no amount of heat fixes a pairing that was never going to work.
Then the platen roller. Faint, patchy or fading that survives all of the above is usually the rubber rather than the head, and it costs a fraction of one — service and repairs →
A sharp white line down every label is none of these. That is a burnt-out element, the head is finished, and no setting brings it back — printheads, and how to pick the right one →
And if the label is in the wrong place rather than too light, that is a feeding fault and a different page — feeding, skipping and printing over the gap →
It is a ten minute phone call.
Finding a sweet spot is quicker with somebody who has done it a few hundred times, and we keep these machines here to press the buttons on while you press yours.
0414 53 53 95, or andrei@barcodedatalink.com. Have the model off the plate, and a bad label in your hand.